Convert PNG to JPG Under 50 KB for Online Forms (With Real Limits)
To get a PNG under 50 KB for an online form, use Compress Image with the 50 KB target and JPG output. If your file has transparency, convert your PNG to JPG first with a white background. The browser tool reduces quality and pixel dimensions automatically to meet strict upload size requirements.
Which file size limits apply to your application form?
Some exam and recruitment portals set a minimum as well as a maximum. A file that is too big fails, and so does a file that is too small.
Different examination boards set different limits, and numbers often vary between official pages published by the same agency. For instance, the official notice for the SSC Combined Higher Secondary Level Examination (CHSLE) 2022 asked for a JPEG photograph between 20 KB and 50 KB, and a JPEG signature between 10 KB and 20 KB. That notice is an older reference used as an example.
Specifications can also change across individual notices issued by the same commission. In the UPSC Examination Notice No. 08/2026-CAPF dated 20.02.2026, the instructions state that the "photograph file should not exceed 200 KB and must not be less than 20 KB in size and signature file should not exceed 100 KB and must not be less than 20 KB in size" in .jpg format.
Yet on the official UPSC online application FAQ, the guidelines state that each scanned photo and signature "should not exceed 300 KB and must not be less than 20 KB" and require "350 pixel (Width) * 350 pixel (Height) minimum and 1000 pixel (Width) *1000 pixel (Height) maximum". Because even two pages from the same exam board give different numbers, always follow the specific PDF notification and upload instructions for your exam.
So there are two problems to solve: a file that is too big, and a file that is too small.
How to compress a PNG screenshot to JPG under 50 KB
A phone screenshot saved as PNG is often a few hundred KB, because PNG keeps every pixel exactly.
We tested this with a screenshot of a document-like web page taken at Pixel 7 phone size in the browser (1082 × 2202 pixels), 253.1 KB as a PNG. We processed this file using different settings in Chromium on 23 October 2026 to see what happens.
| What we did | Result shown by the tool |
|---|---|
| PNG to JPG, Small 70 | 253 KB → 209 KB (17% smaller) |
| PNG to JPG, Balanced 85 | 253 KB → 286 KB (13% larger — try a lower quality) |
| Compress Image, Target size 50 KB, Output JPG, from the PNG | 253.1 KB → 49.6 KB, 579 × 1178 px, quality 30% |
| Compress Image, Target size 50 KB, from the Small 70 JPG | 209.1 KB → 49.9 KB, 577 × 1174 px, quality 32% |
The quality presets alone did not get near 50 KB, and Balanced 85 even made the file bigger. Compress Image with a 50 KB target and JPG output did it in one step. Converting to JPG first gave the same end result.
To fit 50 KB, the tool cut the width roughly in half (1082 to 579 pixels) and used quality 30%. Open the result and check that text and dates are still readable before you upload.
If the text in your compressed image is too blurry to read comfortably, crop away empty margins, headers, or unused white space before running the tool. Cropping removes non-essential pixels so the compression engine does not need to shrink the remaining text as aggressively to hit 50 KB. If your exam notification allows a higher ceiling, such as 100 KB or 200 KB, you can choose that higher target instead. Use the PNG to JPG tool first when your PNG has transparent areas, and make sure to select White as the background colour.
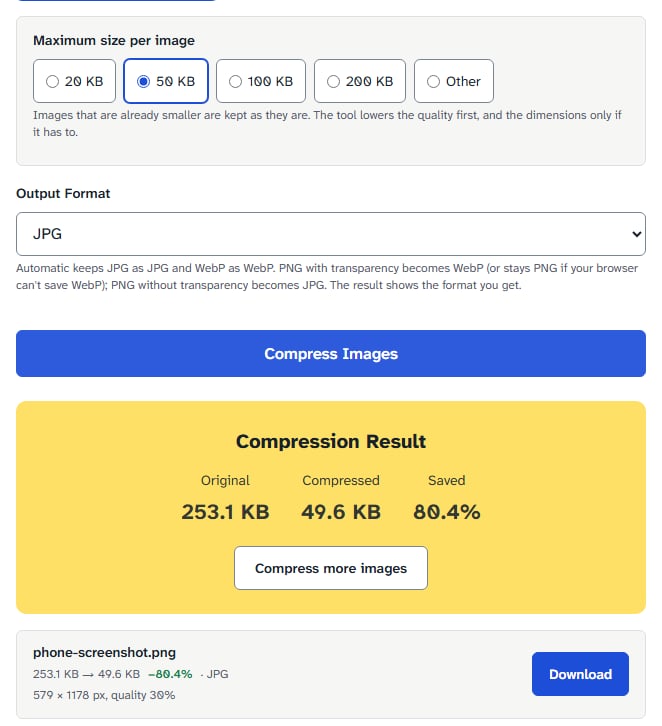
Here is the step-by-step process to compress your PNG directly to a JPG under 50 KB:
- Open Compress Image in your web browser. You can select up to 5 images per run.
- Select your PNG file from your computer or phone.
- Under Compression Level, choose "Target size" and click the "50 KB" chip. If your form requires a custom threshold, select "Other" and enter any target between 5 KB and 5000 KB.
- Set "Output Format" to "JPG". Do not leave it on "Automatic", because a PNG with transparency would become a WebP file instead.
- Click "Compress Images" and download your finished JPG.
What to do when your converted JPG is too small
When a portal has a minimum size, a file below it fails just like a file above the maximum. A clean signature on plain white is one example: because a dark signature on a plain white background contains very little complex detail, standard JPEG compression generates an extremely small file.
We tested a clean, computer-drawn 600 × 200 pixel signature line on a white background, 9.2 KB as a PNG. A real scan with paper texture may come out bigger, so check your own file. The UPSC CAPF 2026 notice says the signature file must not be less than 20 KB, so this 9.2 KB file would be below the minimum.
| What we did | Result shown by the tool |
|---|---|
| PNG to JPG, Balanced 85 | 9.2 KB → 9.1 KB |
| PNG to JPG, Max 100 | 9.2 KB → 17 KB (still under 20 KB) |
| Image Resizer, width 1000 (height 333), JPG, quality 90 (default), enlarging allowed | 999 × 333, 16.0 KB |
| Image Resizer, width 1000, JPG, quality 100, enlarging allowed | 999 × 333, 30.6 KB |
Neither JPG preset reached 20 KB. Compress Image cannot help either, because it keeps files that are already under the target as they are.
The fix is to enlarge the image in Image Resizer and raise the quality. Turn off "Do not enlarge smaller images" (it is on by default). At 1000 pixels wide and quality 100 we got 999 × 333 pixels and 30.6 KB, inside the 20 KB to 100 KB range in the UPSC notice. If your exam also has a pixel minimum, such as the 350 × 350 in the UPSC FAQ, meet that too: our 333 pixel tall example would need to be taller under that rule.
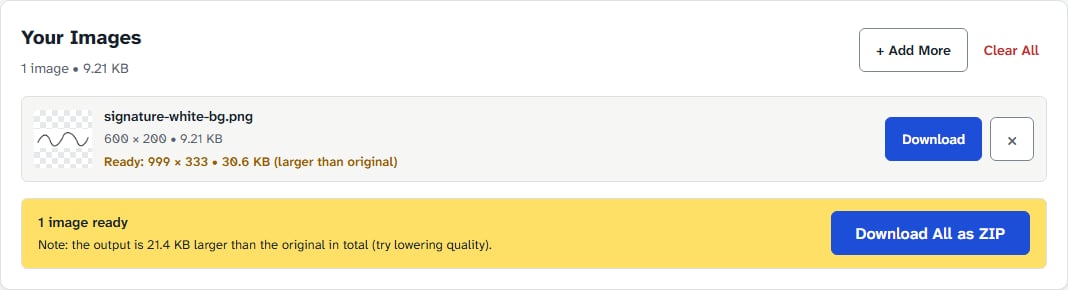
To increase the file size of an undersized signature or photo, follow these steps:
- Open Image Resizer in your browser and choose your file.
- Select the "Custom" tab to set dimensions.
- Enter larger dimensions, such as a width of 1000 pixels, keeping the aspect ratio locked.
- Turn off "Do not enlarge smaller images" to allow upscaling.
- Set the output format to JPG and push the quality slider to 100.
- Click "Resize Images" and download the expanded file.
What to check before uploading your image to a portal
A portal rejects the file if any one check fails. Before you upload:
- File size in kilobytes: Verify that your file size sits above the minimum threshold and below the maximum cap. For a 20 KB to 50 KB requirement, a file measuring 19.5 KB or 50.4 KB will fail.
- Pixel dimensions: Check both width and height. Some portals also set pixel limits; the UPSC FAQ, for example, gives a 350 × 350 pixel minimum. If you need to set exact dimensions for SSC or other exam notices, follow our guide on photo and signature size for online forms.
- Visual sharpness: Open the saved JPG on your device screen at full size. Make sure text characters, numbers, and signature strokes remain clear and legible.
- File format: Ensure the file extension is
.jpgor.jpeg(the same format) and that the file was properly converted rather than simply renamed.
Common mistakes when preparing form images
- Renaming the file extension manually: Changing a file name from
photo.pngtophoto.jpgin Windows Explorer or a phone file manager does not convert the image data. The file inside is still a PNG, and an upload check that reads the file contents can reject it. - Leaving Output Format set to Automatic: In Compress Image, the Automatic format setting converts transparent PNGs into WebP files. If your notice asks for .jpg, as the UPSC notice does, a WebP file will not do, so set Output Format to JPG.
- Using Max 100 quality on large files: Setting the quality slider to Max 100 on an oversized screenshot increases file weight rather than reducing it. High quality levels preserve subtle noise, pushing files well past the 50 KB ceiling.
How we tested
We ran both tests on the live QuickFileTools pages on 23 October 2026, in Chromium on a desktop computer. The screenshot was a web page captured at Pixel 7 phone size (1082 × 2202 pixels, 253.1 KB PNG). The signature was a computer-drawn line (600 × 200 pixels, 9.2 KB PNG). Every number above is what the tools showed.
Frequently asked questions
Can I convert and compress a PNG under 50 KB on a mobile phone?
Yes. The tools run directly inside your mobile browser on Android and iPhone. All processing happens on your local device hardware, so you do not need to install third-party mobile apps.
Why does a portal reject my JPG when the file size is 45 KB?
Online portals check pixel dimensions in addition to byte size. If your notice requires minimum dimensions of 350 × 350 pixels or an exact aspect ratio, an image that meets the 50 KB limit can still fail dimension validation.
What happens if my PNG has a transparent background?
If you convert a transparent PNG directly to JPG without choosing a background, web browsers fill transparent areas with black. To prevent black boxes behind your signature, use the PNG to JPG tool first to set the background colour to White before compressing.
Convert your form images locally
Meeting strict application portal rules does not require sending personal identity documents across the internet. You can compress oversized screenshots, expand undersized signatures, and turn your PNG into a JPG directly inside your web browser. All file processing runs on your local machine, so your files stay on your device.
Related guides: Why Is My JPG Bigger Than My PNG? · Why Your PNG Turns Black When Converted to JPG